Friday, December 16, 2011

Quick and Easy Chicken Noodle Soup

I consider myself very very lucky that I live so close to work and get to go home at lunch most days. With it getting colder I have started craving soup at lunch and today was no exception. I had made up some homemade chicken stock last weekend...but that didn't really turn out as I had hoped. Add that to the failed recipe pile! But that did mean that I had some shredded cooked chicken that I needed to use. I also happened to have some carrots, celery, chicken stock and noodles on hand...so I pulled together a quick and easy chicken noodle soup! This actually took very little time and it was great because I got to add as much or as little of the ingredients as I wanted. I also used the Trader Joe's delicious chicken stock which was super thick and creamy after it had gotten cooked through the whole recipe - so it made a think broth which I loved.
 
 
Quick and Easy Chicken Noodle Soup
 
  • 2-3 cups chicken broth
  • 1 small carrot, diced
  • 1 Celery stalk, diced
  • 1 1/2 cups egg noodles
  • 1/4-1/2 cup shredded, cooked chicken
 
Bring stock to a slow boil in a pot. Add celery and carrots and cook for about 10 minutes or until slightly tender. Add egg noodles and boil for time on bag (around 8 minutes). After noodles are done cooking, add chicken pieces and cook for another 2 minutes or until the chicken is heated through. Season with salt and pepper.


CHEERS!

Wednesday, December 14, 2011

Funfetti Cake Truffles

Now starts the holiday baking season for me. My family is having our Christmas celebration this weekend in Indianapolis so I am trying to pull together some yummy cookies for the occasion! One of the things I've been making for the past year are cake truffles...people call them all kinds of different things...cake pops, cake balls, cake truffles...I go with truffles - makes them sound fancier :) I have made these with all homemade ingredients - cake and icing - and have made them with the box mix. I have to say there isn't much of a taste difference here...so if I'm short on time I just use the box cake mix and ready made frosting.

I do want to put in a shout out here for the Ghiradelli chocolate candy and dipping bars. We ordered these from Amazon after realizing that chocolate chips are NOT good for melting (the chips are made to withstand high heat so they are still in shape when baking in cookies!). We got one white chocolate bar and one double chocolate bar...they worked SO WELL. The chocolate stayed smooth and liquid for a long time so we didn't have to reheat at all during the process.

Funfetti Cake Truffles


  • 1 box funfetti cake mix
  • 1 can frosting
  • 1/2 bar of candy & dipping chocolate bar (or 1-2 bags of candy melts)
  • Festive sprinkles
Bake cake according to directions on the box. Let cool completely.

Once cool, tear the cake into small pieces and - using your hands - incorporate the entire tub of icing. You should get a mixture that is sticky and able to roll together into balls. Roll small balls of the mixture and place onto a baking sheet. Once the baking sheets are full, put them into the freezer for about 20 minutes. Towards the end of the freezing time, start melting the chocolate.

Ready one or two baking sheets covered in wax paper to put the finished truffles on. When ready, remove the balls from the freezer and dip one by one into the melted chocolate. Place finished truffles on the prepared baking sheets and sprinkle with decorations. Let the chocolate harden and store in an airtight container.


CHEERS!

Monday, December 12, 2011

Cheddar Ale Soup

I've been looking for a cheddar ale soup recipe for years. There is a local brew pub that serves a DELICIOUS soup with the most amazing soft pretzel on the planet. This weekend I decided to try out this recipe from Fake Ginger, a blog that I have recently stumbled across and really enjoy! What originally drew me to the recipe was the pretzel bowl...genius! The soup was delicious too :) Pretzel bowl recipe coming soon...

Cheddar Ale Soup
  • 1 lb sharp cheddar, shredded
  • 1 onion, diced
  • 2 celery stalks, diced
  • 2 carrots, diced
  • 3 cloves of garlic, minced
  • 1/3 cup flour
  • 2 cups of chicken stock
  • 2 cups of milk
  • 1 cup of your favorite beer (we used Capital Brewery's Oktoberfest)
  • 4 strips bacon
  • 1 Tbsp Worcestershire sauce (we didn't have any bacon or Worcestershire but I feel like these would've added to the deliciousness!)

Dice bacon and cook in dutch oven until crisp. Discard all bacon and grease except 2 tbsp of the fat. Cook the onions, carrots and celery until soft - about 20 mins. Add the garlic and cook until just fragrant. Pour the flour in and mix so the veggies are coated. Cook for about 3 minutes. Add the beer and cook for 3 minutes. Add the Worcestershire, milk and broth. Simmer for 10-12 minutes until thickened.

Use an immersion blender (or pour into a regular blender) and puree the vegetables. Take the soup off the heat and add the cheese in batches making sure it all melts. Season with salt and pepper - top with bacon pieces.

CHEERS!


Source: Fake Ginger

Tuesday, December 6, 2011

Pumpkin Cheesecake

Here is another recipe from our crazy Thanksgiving holiday dessert list! Pumpkin cheesecake. Yum. This cheesecake came out so light and fluffy - almost like a mousse. This recipe got so many compliments it is definitely going in my dessert arsenal!

Pumpkin Cheesecake
photo source: foodnetwork.com


For the cake
  • 2 1/2 cups sugar
  • 2 pounds cream cheese at room temperature
  • 1/4 cup sour cream
  • 1 15-ounce can pure pumpkin
  • 6 large eggs, at room temperature, lightly beaten
  • 1 Tbsp vanilla extract
  • 2 1/2 tsp ground cinnamon
  • 1 teaspoon ground ginger
  • 1/4 teaspoon ground cloves
  • 1 tsp salt

For the Crust
  • 5 oz. graham crackers, broken into crumbs
  • 3 tbsp. sugar
  • ½ tsp. ground ginger
  • ½ tsp. ground cinnamon
  • ¼ tsp. ground cloves
  • 6 tbsp. unsalted butter, melted

Preheat oven to 325 degrees.

Combine all dry spices with melted butter and graham crackers. Push the crumb mixture onto the bottom and up the sides of a springform pan, making sure to pack tightly. Bake for 15-20 minutes (until lightly browned) and set aside to cool.

 Bring a medium pot of water to a boil. While the water is heating, beat the cream cheese until smooth. Add the sugar and beat until light and fluffy. Add sour cream and mix until incorporated. Add pumpkin, eggs, vanilla, salt and spices until JUST combined. Pour the mixture into the springform pan.

Place the springform pan into a roasting pan and place in the oven. Add the boiling water to the roasting pan until the water comes about halfway up the sides of the cheesecake pan.

Bake until the outside of the cheesecake sets but the center is still loose, about 1 hour 45 minutes. Turn off the oven and open the door briefly to let out some heat. Leave the cheesecake in the oven for 1 more hour, then carefully remove from the roasting pan and cool on a rack. Run a knife around the edges, cover and refrigerate at least 8 hours or overnight.


CHEERS!


Adapted from: Food Network Magazine and Annie's Eats

Friday, December 2, 2011

Carrot Cake

For Thanksgiving my family went a little overboard on the desserts. I'm not saying it's a bad thing - there were just a TON of desserts. I'm going to post a couple of favorites from the meal over the next few days. The first one is carrot cake. I never thought I was a fan of carrot cake but this recipe is so yummy and with all the spices it tastes just like fall and the holidays. This is also a pretty easy recipe - that uses ingredients you probably already have on hand for the holiday baking season.
 
Carrot Cake with Cream Cheese Frosting
 
picture credit: Cook'sIllustrated.com
 
For the cake:
  • 2 1/2 cups all-purposr flour
  • 1 1/4 tsp baking powder
  • 1 tsp baking soda
  • 1 1/4 tsp ground cinnamon
  • 1/2 tsp ground nutmeg
  • 1/8 tsp ground cloves
  • 1/2 tsp salt
  • 1 pound carrots, peeled
  • 1 1/2 cups sugar
  • 1/2 cup brown sugar
  • 4 eggs
  • 1 1/2 cup vegetable oil
 
For the frosting:
  • 8 oz cream cheese, softened
  • 5 Tbsp unsalted butter, softened
  • 1 Tbsp sour cream
  • 1/2 tsp vanilla extract
  • 1 1/4 cups powdered sugar 
 
 
Cake:
Preheat oven to 350 degrees. Flour a 13 x 9 baking dish and set aside. In a large bowl, whisk together flour, baking powder, baking soda, cinnamon, nutmeg, cloves, and salt & set aside. Shred your carrots - you should end up with about 3 cups - and set aside.
 
In the mixer, cream the sugar, brown sugar and eggs until combined. Once combined, tuen mixer to low and in a slow, steady stream add the oil. Once all the oil is added, turn mixer to high and beat until smooth. Remove bowl from stand mixer. Add carrots and dry ingredients - mix by HAND. DO NOT OVERMIX or the cake will be tough. It is ok if there are streaks of flour in the bowl.
 
Pour batter into baking dish - bake 35-40 mins.
 
Frosting:
Mix sour cream, cream cheese, vanilla and butter until combined and smooth. Add powdered sugar in stages until fully combined. Spread on cake once the cake has fully cooled.


CHEERS!


Thursday, December 1, 2011

Beef Stroganoff

Here's another keeper! This recipe was passed on to me by P's mom and it is the most delicious stroganoff recipe I have tried. And it is also SUPER easy. This last time I made the dish was about the third time that I have tried it and it turned out amazing. Don't be fooled by the picture - it's impossible to get a good picture of beef stroganoff!

Like I said in my last post...winter is the time for comfort foods - and a time for my thighs to start hating me :)

Beef Stroganoff

  • 1.5 pounds beef stew meat
  • 16 oz container of sour cream (low fat is fine)
  • 1/2 pound sliced mushrooms
  • 1 package beef stroganoff mix
  • 1 small can of cream of mushroom soup
  • 1 onion, diced small
  • Egg noodles

Heat olive oil in a dutch oven. Brown meat and onions - add salt and pepper to season. Pour meat and onions into a crock pot. Add sour cream, stroganoff mix, cream of mushroom soup and mushrooms to the crock pot. Mix all ingredients together.

Cook on low for 5-6 hours (until meat falls apart). Turn to keep warm setting and bring a pot of water to a boil. Season with salt and cook noodles. Serve stroganoff over noodles.


CHEERS!

Wednesday, November 30, 2011

Buttermilk Mashed Potatoes & Easy Garlic Herb Bread

It's that time of the year again...winter. The cold wind, cloudy days and snow are here to stay. And in Chicago that means we won't be seeing any warm days for the next 6 months. Only good part about winter time? Well the holidays of course! But also the yummy stick to your ribs comfort food. My favorite kind :)

The other weekend we had a wonderful Sunday dinner of garlic herb bread, mashed potatoes and pot roast. Everything turned out amazing - I'll share the pot roast recipe later...it is a definite keeper. I tried making mashed potatoes the way Ina does - with a potato ricer. I think I'm going to stick with it! The potatoes were so light and fluffy - and it was so much easier than hauling out the hand mixer from the depths of my cabinet!

Let me also say this garlic herb bread is super easy but tasted fantastic! A good addition to any hearty winter (and always carb-filled) meal.


Buttermilk Mashed Potatoes

  • 1.5 lbs yukon gold potatoes, peeled and quartered
  • 1/4 cup milk
  • 1/2 stick butter
  • 1/2 cup buttermilk
  • Salt
  • Pepper

Bring a large pot of water to a boil and season with salt. Add potato quarters and boil for about 12 minutes - or until a fork goes through the potatoes easily. Drain and set aside.

Heat milk and butter in a small sauce pan until melted together - do not let this boil.

Process potatoes through a potato ricer and add milk & butter mixture and buttermilk. Mix until all ingredients are combined. Add salt and pepper to taste - serve warm.

Source: Food Network


Garlic and Herb Bread

  • 1 can refreigerated french bread dough
  • 1/4 stick of Kerrygold garlic and herb butter

Put bread in the oven following the directions on the can. While the bread is cooking, melt the butter. Remove bread after half of the cooking time has elapsed. Carefully cut slits in bread about every 1/2 inch (do not cut bread all the way through). Brush metled butter over the top of the bread and in the slits. Put bread back in the oven for the rest of the cooking time.


CHEERS!

Tuesday, November 22, 2011

Kettle Chip Chicken

Ok - so things have been pretty hectic lately! I have a few recipes that need to be blogged so I will start with this one. I'm always looking for easy weeknight meals that don't require a lot of prep or work :) This is definitely one of those meals! It has been all over Pinterest (one of my new obsessions!) and was originally posted on one of my new fav blogs. It is potato chip crusted chicken. P is not the biggest fan of jalepenos so I had to adjust the original recipe slightly. I think it was a hit! Very easy to prepare and tasty too :)
 
 
Kettle Chip Chicken
 
  • 2 chicken breasts, pounded thin
  • 2 cups crushed kettle cooked chips (we used BBQ)
  • 1/3 cup shredded parmesan cheese
  • 1 cup buttermilk
  • dash of cayenne pepper
  
Preheat oven to 375 degrees.
 
Mix the buttermilk and cayenne pepper in a bowl. In a shallow bowl, combine the chips and parmesan cheese. Place a cooling rack inside of a jelly roll pan and spray with non-stick cooking spray.
 
Dip the chicken (one at a time) into the buttermilk and dredge in the chip/cheese mixture - be sure to press the chips onto the chicken to help them stick. Once both sides are coated, place on cooling rack.
 
Bake for 25-30 minutes (depending on how thin you pounded the chicken).


CHEERS!
 
 
Adapted from: My Life as a Mrs.

Wednesday, October 26, 2011

Buttermilk Pancakes

I love breakfast. Seriously love it. Problem is...we aren't usually around for breakfast time on the weekends. The mornings start early with the dogs and then we are off doing our work for the day. This week I decided to have breakfast for dinner - one of the best kinds of dinners there is! We made some SENSATIONAL buttermilk pancakes with our favorite Trader Joe's applewood smoked bacon. Needless to say, this was not on my pre-wedding diet plan. :) We had some leftovers that I wanted to flash freeze - but P just enjoyed them the next morning from the fridge.
Buttermilk Pancakes
  • 2 cups all-purpose flour
  • 2 tablespoons granulated sugar
  • 1 teaspoon baking powder
  • ½ teaspoon baking soda
  • ½ teaspoon salt
  • 2 cups buttermilk
  • ¼ cup sour cream
  • 2 eggs
  • 1 tsp vanilla
  • 3 tablespoons melted butter, cooled slightly


Whisk the dry ingredients- flour, sugar, baking powder, baking soda and salt - together in a bowl. In a separate bowl, whisk together the wet ingredients - buttermilk, sour cream, butter and vanilla. Pour wet ingredients into dry and mix until JUST combined - it will be lumpy and you might have some flour streaks but that's ok.

Melt a couple of tablespoons of butter in a skillet over medium/high heat. When the butter starts to sizzle, drop about a 1/4 cup of batter on the skillet (we can usually fit 2 at a time - the finished ones go in the oven on "warm"). After the edges set (usually 2-3 minutes) flip and cook for another few minutes on the other side.
Enjoy with butter and syrup.


CHEERS!


Adapted from: Brown Eyed Baker; originally from Cook's Illustrated

Tuesday, October 11, 2011

Raspberry Cobbler

So I noticed that I've been posting a lot of chicken recipes lately...so I decided to switch it up today. I really like dessert - a lot. But it is hard to make 24 cupcakes every weekend...especially when it's just 2 of you at home. This is the easiest dessert I've come across in a while - no crazy ingredients, virtually no prep time and it can be scaled down to feed just a couple of people for a couple of days :) I'm pretty sure you will have all of these ingredients in your pantry too - which is always a plus.

Raspberry Cobbler

  • 1 stick butter
  • 1 cup sugar, plus more for sprinkling
  • 1 cup self rising flour
  • 1 cup milk
  • 1 teaspoon vanilla
  • 1 package raspberries

Preheat oven to 350 degrees.

Melt the stick of butter in the microwave and set aside. Whisk together the cup of flour and cup of sugar. Add the milk, melted butter and vanilla. Whisk together until a batter forms. Pour batter into a buttered baking dish.

Wash the raspberries and pat them dry. Sprinkle dry berries over top of the batter. Sprinkle sugar over berries.

Bake for 45-50 minutes.


CHEERS!


Adapted from Pioneer Woman

Monday, October 10, 2011

Chicken Parmesan

P is somewhat of a picky eater. He will whole heartedly deny that if you ask him to his face - but in my opinion he is picky. He likes very simple meals - and they always need to involve some kind of meat. Needless to say, he isn't the biggest fan of some of my more different meals. When he tells me that he has a favorite dish that I make...that means it has to be really good. This chicken parmesan is as he said the other night - one of his favorite meals that I make. So that means this is a good recipe people! It is super easy and always turns out great. This would make any picky eater happy.
 
 
Chicken Parmesan
 
  • 1 1/2 cups panko breadcrumbs
  • 1/2 cup grated parmesan cheese (I prefer freshly grated for this recipe)
  • 2 chicken breasts, butterflied (to make 4 total pieces)
  • 1/2 cup flour
  • 1/ 1/2 teaspoons garlic powder
  • 1 tablespoon salt
  • 1 teaspoon pepper
  • 3 egg whites
  • 1 tablespoon water
  • Shredded mozzarella cheese
  • Marinara sauce
  • Dried (or fresh) basil
 
 
Preheat oven to 475 degrees.
 
Heat olive oil in a skillet and add panko breadcrumbs. Toast until lightly browned - then set aside to cool. Get our 3 shallow bowls. Put cooled breadcumbs and parmesan cheese in one; beat egg whites and water in another; mix flour, garlic powder, salt and pepper in the third. Pat chicken breasts dry and then dredge in flour mixture - then egg white mixture - and finally breadcrumb mixture. Place coated chicken on a baking sheet covered in foil that has been sprayed with non-stick spray.
 
Bake chicken for 15 minutes or until cooked through. Remove from over and spoon desired amount of marina sauce on each breast. Sprinkle with mozzarella and basil. Put chicken back in oven for about 5 more minutes or until the cheese is melted.


CHEERS!


Source: Annie's Eats, adapted from Brown Eyed Baker, originally from Cook’s Illustrated, October 2006 

Thursday, October 6, 2011

BBQ Chicken Pizza Braid

I think one of the best things at Trader Joe's (and there are A LOT of good things there) is their ready made pizza dough. It is a lifesaver on the busy weeks when we just don't have a lot of time to cook. We use the dough to make all kinds of regular pizza - but the I discovered the pizza braid when I was browsing though the internet. Homemade pizza is probably one of the easiest things to make during the week - no measuring and not a lot of prep. Just put the toppings on and stick it in the oven!

BBQ Chicken Pizza Braid

  • 1 package store-bough refrigerated pizza dough (or homemade)
  • 1 bottle of your favorite BBQ sauce
  • Shredded mozzarella cheese
  • Shredded sharp cheddar
  • Diced red onions
  • 2 cooked chicken breasts, chopped (I usually cook these the night before)
  • Dried cilatro (or fresh if you have it!)
Preheat oven to 350 degrees.

Take piza dough out of the fridge and let sit in an oiled bowl for 25-35 minutes. When the dough is pliable, spread cornmeal on a flat surface and work the dough into a rectangle. Place all of your ingredients in the center of the dough rectangle, leaving about an inch of dough around the filling. (NOTE: like I said before, no need to measure the ingredients - just put on as much or as little as you like!) Using a pizza cutter, slice the edges of the dough into strips. Pull the strips across the filling and pinch to the other side of the dough to secure. Once the entire pizza is braided, put in the oven for about 20-25 minutes.


CHEERS!

Monday, October 3, 2011

Pizza Chicken

Some people might call this chicken kiev - but P's family calls it Pizza Chicken. When he and his sister were kids, they would say that is always smelled like pizza when their mom was cooking it. I have had the recipe for awhile but hadn't made it yet - it turned out pretty delicious! The chicken stayed moist and the breading and sauce had great flavor. Next time I'm going to serve it with a yummy creamy noodle side.


Pizza Chicken
  • 2/3 c. butter
  • 1/2 c. bread crumbs
  • 2 tbsp. grated parmesan cheese
  • 1 tsp. basil leaves
  • 1 tsp. oregano leaves
  • 1/2 tsp. garlic salt
  • 1/4 tsp. salt
  • 2 chicken breasts (split)
  • 1/4 c. white wine
  • 1/4 c. chopped green onions
  • 1/4 c. chopped fresh parsley
Heat oven to 375. Melt Butter. Combine bread crumbs, Parmesan cheese, basil, oregano, garlic salt and salt. Dip chicken breasts in melted butter, then coat with bread crumb mixture. RESERVE remaining butter. Place chicken in ungreased baking pan. Bake for 50-60 min. or until chicken is fork tender. Meanwhile, add wine, green onion and parsley to melted butter. When chicken is golden brown, pour butter around chicken. Continue baking for 3-5 minutes or until sauce is heated through.
CHEERS!
Source: Family Recipe

Thursday, September 8, 2011

Tortellini Bake

I am always looking for an easy, quick recipe for those nights when we are too busy to make a really involved meal. P isn't the biggest fan of pasta so we don't have it often but I really like it - especially the ease of it! 

Because of camping this past weekend I didn't have much time to prepare a menu so I just went with some good standby recipes. Trader Joe's has this delicious, cheap tortellini that I love to get. I wanted to make it a little more exciting than just a regular boiled pasta for P so I decided to go with a baked tortellini. He said it was definitely better than just plain pasta - so I think it was a success! It requires very little prep and only a few ingredients. You could definitely amp it up by adding some veggies and meat - I'll probably try that next time.


Tortellini Bake
 
 
  • 1 package tortellini (any flavor); if frozen - thaw pasta before baking
  • 1 jar meat spaghetti sauce
  • Shredded mozzarella cheese (or any italian mixture)
 
Preheat oven to 350 degrees. In a large bowl, combine pasta, sauce and a few handfuls of cheese. Pour into a greased baking dish. Cover with foil and bake for 25 minutes. Remove from oven and stir. Bake covered for another 25 minutes. Sprinkle desired amount of cheese on top and contiue baking (uncovered) for about 5 minutes until the cheese is melted. Let stand for 5 minutes before serving.


CHEERS!
 

Wednesday, September 7, 2011

Camping Cuisine

Every Labor Day weekend P and I pack up our two little cars to the brim and head downstate to Starved Rock State Park for a weekend of camping in the great outdoors. This year was no excpetion - even though the temps were in the 90s for Friday and Saturday! The dogs love the trip and so do we. It is a nice, relaxing weekend where we can catch up on sleep, enjoy each other's company and drink plenty of beers :)
We have gotten pretty good at the camping routine - packing up; setting up camp; planning out the hikes; tearing down camp. The one thing that we wanted to work on this year was the menu. We usually just do the usual grill food (hot dogs, burgers, sloppy joes) and some mac and cheese. But this year I got to spice up the menu. I can't stress enough the importance of having a multi-day cooler when camping. We got a fantastic 5-day cooler that we keep all of our meat and cheeses in and the ice stays frozen through the entire weekend - no opportunity for any meat to spoil!
Here are some of the meals we had this year...

Breakfast Burritos
  • Tortillas
  • Eggs
  • Bacon (cook this the night before you leave and chop it into small pieces; store it in the cooler)
  • Shredded Cheese
Scramble eggs in skillet over camping stove. Towards the end of cooking, add a small amount of chopped bacon to eggs to reheat the meat. When eggs are done, quickly heat up tortillas to make them more plyable. Portion egg and bacon onto tortillas and top with shredded cheese. Wrap and enjoy.

Buffalo Chicken Wraps
  • Chicken breasts
  • Buffalo wing sauce (we use Frank's)
  • Lettuce shreds (you can find this by the bag salads at the grocery)
  • Shredded Cheese
  • Tortillas
Grill chicken breasts. Chop into bite size pieces and dry off with a papertowel. Pour chicken into ziploc bag and add buffalo wing sauce. Coat chicken pieces. Heat tortillas in skillet on camping stove to make them plyable. Add chicken, cheese and lettuce to tortillas and wrap.

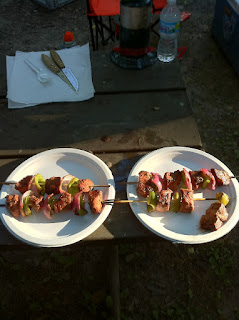
Steak Kabobs
  • Tri tip sirloin steak
  • Beef marinade (we use Stubb's. Best. Marinade. Ever.)
  • Green Peppers
  • Red Onions
  • Skewers
The night before leaving for camp, cut steak into kabob size pieces and put in freezer bag. Add marinade to bag. Put meat in freezer until ready to leave. Chop onions and green peppers and put in cooler - this minimizes prep time at the campsite.
When ready to eat the kabobs, take the meat out of the cooler and let sit for 20 mins. Assemble your kabobs and cook on the grill until at desired doneness.


CHEERS!

Friday, September 2, 2011

Easy Baked Risotto

I love Cook's Illustrated. I really do! But sometimes their recipes are way to daunting and require too much work for what they are - case in point my poor attempt at the Grasshopper Pie for St Patty's day dessert. So yes, while I do love Cook's Illustrated for more entertaining events (family dinners, etc) I think a more fitting magazine for our family is Cook's Country. Made by the Cook's Illustrated folks but with recipes that aren't too hard - especially when you don't have much time on a weeknight.
Risotto has been on my cooking bucket list for about a year now. Aftert I first tasted it I knew I had to learn how to make it. So when I came across the easy baked risotto recipe on the Cook's Country website...I was determined to try it! This took a little bit of prep time - but after the prep you really do nothing while it cooks. Which is good for me when I'm trying to finish laundry or pick up the house while dinner is cooking. P doesn't really like rice all that well but he actually loved this! But really...what is there not to love? Butter, rice, parmesan cheese and more butter. How can that not be good??
We had this as a side dish with an easy and quick grilled chicken breast. I will also say that this recipe makes A LOT of risotto. Like an entire dutch oven full! I'm thinking of making this the main dish next time - add some frozen peas and maybe some chopped chicken or prosciutto. Yum :)

Easy Baked Risotto

Picture credit goes to Cook's Country online
  • 5 cups low sodium chicken broth
  • 1/2 cup water
  • 2 bay leaves
  • 1/2 tsp salt
  • 3/4 onion, minced
  • 2 cups Arborio rice (I got this at Trader Joe's)
  • 3 cloves garlic, minced
  • 1/2 cup dry white wine (I used Chardonnay)
  • 1 1/4 cups freshly grated parmesan cheese
Preheat oven to 400 degrees.
Bring broth, water and bay leaves to simmer in a pan over medium-high heat. Once simmering, cover with lid and put burner to low. While broth mixture is heating, melt butter in a dutch oven. Add minced onion and salt and cook until trnaslucent and lightly brown. Add rice to dutch oven and toast until edges become translucent (about 2 mins). Add garlic and cook until fragrant - about 30 seconds (don't let the garlic burn!). Stir in the wine and heat through until completely absorbed. Pour broth mixture into dutch oven. Cover with aluminum foil - press down on the foil so that it is touching the top of the mixture in the dutch oven. Put lid on. Bake about 20-22 mins or until the liquid is all absorbed. Take out of the oven and remove bay leaves. Mix in the parmesan cheese until it is melted and creamy. Season with salt and pepper.

CHEERS!

Adapted From Cook's Country


Tuesday, August 30, 2011

Mac and Cheese Pizza

So it's been awhile - I know...but with the busy summer winding downI feel like P and I can finally start keeping up with the blog again! The engagement/wedding planning whirlwind along with the craziness of summer weekends made for a few months of not a lot of down time! But here we are...ready for fall (at least I am - can't say the same for P!) and ready to get back to the blog!

This particular recipe reminds me of summer for sure - after a fun night out with friends in downtown Chicago Ian's Pizza is almost a guarantee. The pizza chain started in Madison (another city near and dear to our hearts!) and they serve up some delicious - and interesting - pizzas. My favorite pizza to get is the mac and cheese. It's always one of the 2 slices that I pick! After Food Network Magazine named the mac and cheese pizza the BEST pizza in Wisconsin I knew I had to learn how to make it! I made this recipe with store bought pizza dough and pizza sauce from Trader Joe's - which is nice if you want to make this on a weeknight. Otherwise you can always make the dough and/or sauce from scratch! Also it's good to note that I didn't include measurements because I think you need to put as much or as littel toppings on as you like.


Ian's Mac and Cheese Pizza
1 package refrigerated pizza dough
1 jar pizza sauce
1 package creme fraiche (I found mine in the specialty section of my local Whole Foods)1/2 box of macaroni
Mozzarella cheese, shredded
Sharp cheddar cheese, shredded
Medium cheddar cheese, shredded
Cornmeal or Flour
Salt
Pepper


(Obviously NOT my picture! I didn't remember to take one - but how DELICIOUS does this look??)


Let dough sit at room temperature for about 30-40 mins in an oiled bowl  (we have found that leaving it out that long makes it MUCH easier to work with). While the dough is resting, boil a pot of water and cook the macaroni for about 5 minutes (it will keep cooking when in the oven) - drain and set aside. Preheat oven to  400 degrees.

Pour cornmeal or flour (we like cornmeal) on a rolling mat. Pour dough onto rolling mat and work until you get the desired size pizza. Drizzle olive oil on dough and top with layer of creme fraiche. Then put a layer of the shredded mozarella cheese. Next put a layer of the cooked macaroni. Top the noodles with a mixture of the 2 kinds of cheddar. Season with salt and pepper. Bake for about 20-23 minutes.


CHEERS!


Wednesday, May 25, 2011

Pulled Pork Sandwiches

The other week was our last meeting of RCIA at our local church - and this meant pot luck dinner! For the last pot luck we made chili because it was the middle of winter but this time we wanted to make something that felt spring-y (if that's a word). Pulled pork is such an easy and delicious option for a meal - just pop it into the slow cooker in the morning and you are ready to eat byt the time you get home from work!

Sorry guys - no picture this time!

Pulled Pork Sandwiches
  • 2 pound pork shoulder
  • 1 bottle root beer
  • Water
  • 1-2 bottles of barbeque sauce
  • Hamburger buns

Put pork shoulder in slow cooker and pout root beer over top. Add water until liquid barely covers the pork. Cook on low for 8 hours or until pork shreds easily. Drain pork and shred in crock pot. Add barbeque sauce to taste.

Serve warm on hamburger buns.


CHEERS!


Adapted from my dad's recipe

Lasagna for Two

I love lasagna - I don't love the huge amount of time it takes to prepare lasagna. Especially when it is just the 2 of us. That's a problem I have with a lot of recipes - they are made for families of 6! This recipe is definitely better portioned for a couple and it is an easy fix too!

This was in the latest issue of Cook's Country by Cook's Illustrated. I really like this magazine because it is the same idea as Cook's Illustrated but has less intimidating recipes :) The serving size is smaller but is really still too big for 2 people - so there still might be left overs! I served this with some parmesan garlic breadsticks that were delicious! Just some store bought breadstick dough with garlic powder, parmesan cheese and oregano sprinkled on before baking.

Please don't be scared of the picture...it's hard to get a pretty picture of lasagna!


Lasagna for Two:

Bread loaf baking pan

Sauce:
  • 1 small onion, diced
  • 3 garlic cloves, minved
  • 8 oz 85% ground beef
  • 1 14.5 oz can diced tomatoes, Italian style
  • 1 8 oz can tomato sauce
Filling & Noodles
  • 4 oz ricotta cheese
  • 1/2 cup plus 2 Tbsp grated parmesan cheese
  • 3 Tbsp chopped fresh basil
  • 1 large egg, beaten
  • 1/8 tsp salt
  • 1/8 tsp pepper
  • No-boil lasagna noodles
  • 1 cup shredded mozarella
Preheat oven to 400 degrees.

Heat oil in a dutch oven on the stove. Add onion and pinch of salt and cook until soft. Add garlic and cook until fragrant (do not let it burn!). Add meat and break into small pieces while cooking until meat is no longer pink. Add diced tomatoes and tomato sauce and continue cooking until thickened. Season with salt and pepper.

In medium bowl mix together the ricotta cheese, parmesan cheese, beaten egg, basil, salt and pepper. Cover the bottom of bread pan with sauce. Cover with 1 1/2 noodles (break a noodle in half to cover the bottom). Spread some of the ricotta mixture on the top of the noodle. Sprinkle mozarella cheese on top of ricotta cheese mixture. Cover mozarella with sauce. Repeat layering process 3 more times (4 layers total). Place 1 1/2 noodles on top of final layer and top with remaining sauce and sprinkle parmesan cheese and mozarella cheese on top of sauce.

Bake for 25 minutes covered. Bake uncovered for another 10 minutes. Let sit for 15-20 minutes before serving.


CHEERS!


Adapted from Cook's Country

Thursday, May 19, 2011

Peanut Butter Dog Treats

We have two fantastic dogs - Cooper and Holiday - and they are a huge part of our family. A couple of the guys that came out to help with the patio also have dogs so I decided in addition to the cupcakes I would also make some dog treats for them to take home. All the dogs loved them. I also sent some to work with the fiancee and their dogs loved the treats too! This is a super easy, cheap alternative to the store bought treats.


Here's a picture of the pups - Cooper is the bigger Australian Shepherd and Holiday is the little Schipperke. This is one of the best picture of them - we were at the beach up in Door County, WI.


Peanut Butter Dog Treats:
  • 2 cups whole wheat flour (I got mine at Whole Foods)
  • 1 Tablespoon baking powder
  • 1 cup natural, organic peanut butter
  • 1 cup milk (I used 2%)
Preheat oven to 375 degrees .

Mix flour and baking powder in a large bowl or mixer. Whick together milk and peanut butter in a seperate bowl (I found that putting the milk in the measuring cup first helped keep the PB from sticking to the cup). Add wet ingredients to dry ingredients and combine until fully mixed. Roll out dough on a floured surface to desired thickness. Use any kind of cookie cutter you want to punch out treats. Put treats on a lined baking sheet and bake for about 20 minutes.


CHEERS!


Cookies and Cream Cupcakes

This past weekend we started our patio - a giant DIY project! We enlisted a bunck of our guy friends to come out and help us dig out the back yard. To pay them we provided free beer, pizza and cupcakes. I wanted to make a different kind of cupcake that I had made before so I chose cookies and cream. I made these cupcakes for my soon to be sis-in-law's baby shower and they turned out much better. This time around the cupcake wrappers were REALLY difficult to peel off and were breaking. I didn't do the best job of getting equal amounts in the wrappers so I think some were a little overcooked. But rest assured that was USER error and this recipe is definitely a keeper!


Cookies and Cream Cupcakes
Cupcakes:
  • Bag of oreos
  • 2 1/2 cups flour
  • 1 teaspoon baking powder
  • 1/2 teaspoon salt
  • 8 Tablespoons unsalted butter at room temp
  • 1 2/3 cups sugar
  • 3 egg whites at room temp
  • 2 teaspoons vanilla extract
  • 1 cup milk

Icing:
  • 8 ounces cream cheese at room temp
  • 6 Tablespoons unsalted butter at room temp
  • 1 Tablespoon vanilla extract
  • 4 cups powdered sugar, sifted
  • 2 Tablespoons heavy cream


Preheat oven to 350 degrees. Line two 12 cup cupcake pans with liners. Twist 24 oreos and place half with icing on the bottom of the cupcake liners with the cream side facing up - reserve other half on plate. Take reserved oreo halves and rest of bag of full oreos and put in a ziplock bag and crush into large pieces. In a medium bowl mix all dry ingredients except sugar together (flour, salt & baking powder). In a mixer, cream together the sugar and butter. Blend in egg whites in batches and fully combine after each batch is dropped in. Add vanilla extract. Add half of the dry ingredients that you mixed together earlier and blend until just incorporated. Add milk and mix. Pour remaining dry ingredients into mixer and blend until just combined. Pour crushed cookies into mixer and gently fold in - do not overmix.


Pour batter into cupcake pans and bake for 18-20 minutes. Allow to cool completely before frosting.


For icing - mix butter and cream cheese until fully incorporated. Add vanilla and mix. Add powdered sugar in batches making sure to mix completely after each addition. Add heavy cream and mix on medium-high for about 5 minutes. Put icing in a pastry bag and frost cupcakes as desired.


CHEERS!


Source: Annie's Eats


Wednesday, May 4, 2011

Filets with Parmesan Crust

One of our favorite restaurants is Wildfire Restaurant- the crab stuffed shrimp appetizer is to die for! They have several crusts that you can add to your steaks to really enhance the flavor. I think the crust is perfect with the filets since the cut is known more for its buttery texture than its flavor so the crust adds a little bit more to each bite.

 
We have started ordering food from Peapod for special occassion dinners (like an engagement celebration!). They have a great section that has all kinds of local foods - including Wildfire filets. So we ordered a couple of those the other week and enjoyed them with a delicious parmesan crust!


Parmesan Crusted Filets
  • 2 filets
  • 1 stick of butter (softened)
  • 1/2 cup panko breadcrumbs
  • 1 cup grated parmesan cheese
  • 1 tsp garlic, minced
  • 1/4 tsp kosher salt
  • 1/4 tsp ground black pepper
  • 2 Tbsp shallots, minced
  • 1/2 tsp dried thyme
  • 1/8 cup dried parsley


Whip butter in mixer. Add all ingredients to mixer and mix until fully combined. Shape mixture into a patty about the same size as the filets. Wrap in plastic wrap and put in freezer overnight.

 
When ready to eat - take crust out of freezer and slice to desired thickness (we can usually get around 3 crusts out of this recipe). Top steaks with slices of butter, salt & pepper and bring out to the grill. Grill steaks until almost at desired doneness - for us this means just after they cook to the low end of the medium temperature range. Move steaks to casserole pan and place crusts on top. Put steaks under broiler on high until crust begins to turn brown. Take steaks out and let rest for 10 minutes.


CHEERS!


Adapted from Chicago Cubs Cookbook: All-Star Recipes From Your Favorite Players

Tuesday, May 3, 2011

Microwave Chocolate Cake

I love individual desserts - mostly because with just two of us in the house I end up eating more than half of any cake, pie, batch of cookies, or other dessert that we make! This recipe comes from the latest Food Network Magazine and is part of a fabulous article called 10 minute desserts.

All you need is a commercial break of your favorite show and a BIG mug. No regular coffee cup here - this cake really puffs up while it cooks so you don't want it to overflow the cup. Top the cake with cocoa powder, whipped cream, frosting - whatever you are craving.


Microwave Chocolate Cake
  • 1/4 cup flour
  • 1 egg
  • 5 Tbsp sugar
  • 2 Tbsp cocoa powder
  • 3 Tbsp milk
  • 3 Tbsp vegetable oil
  • Vanilla (as much or as little as you like - I used about 1/2 Tbsp)

In large mug whick together all ingredients. When fully incorporated put in micrwave on high for 2 minutes.


CHEERS!


Source: Food Network

Monday, May 2, 2011

Baked Chicken Taquitos

So we are finally back in the blogging world!! It has been a crazy past few weeks - at home and at work. But I think things are finally settling back into place - or at least a place that I see as manageable :)

We were planning on grilling last night for dinner but thought a storm was coming so we switched dinner plans to chicken taquitos. Of course it didn't end up raining but we definitely didn't mind the taquitos! Also - don't judge me on the photo...not my best work :)


Baked Chicken Taquitos
  • 3 oz cream cheese
  • 1/3 cup salsa verde (I use Trader Joe's brand)
  • juice of 1 lime
  • 1 tsp chile powder
  • 1/2 tsp ground cumin
  • pinch cayenne pepper
  • 1/2 tsp onion powder
  • 3 cloves garlic, minced
  • 3 Tbsp dried cilantro
  • 1 jalapeno, chopped
  • 2 cups cooked and shredded chicken, seasoned with salt, pepper & taco seasoning (this is about 2 chicken breasts)
  • 1/2 cup shredded sharp cheddar cheese
  • 1/2 cup shredded Pepperjack cheese
  • 8-12 small corn tortillas
  • kosher salt
  • cooking spray

Preheat oven to 425 degrees. While oven is preheating, mix together the cream cheese, salsa verde, lime juice, cumin, cayenne pepper, onion powder, garlic, cilantro and jalapeno to create a sauce. Mix in shredded chicken and cheeses.

Heat up corn tortillas 3-4 at a time in the microwave - 25 seconds on high. **This step is super important - the first time I made these I didn't work in small batches and the tortillas would cool and break when I tried to roll them.** Put a heaping spoonful of filling at bottom of tortilla and roll tightly. Place seam side down in baking dish. Continue until filling is gone (or you have desired number of taquitos). Spray the top of the taquitos with cooking spray and sprinkle with kosher salt.

Bake uncovered for 35 minutes until crisp.


CHEERS!


Adapted from Pink Parsley Catering; adapted from Pennies on a Platter, originally from Our Best Bites

Friday, April 8, 2011

Sorry for the delay...

We have been MIA for a little bit but we have good reason! Last weekend we got ENGAGED :) It has been pretty hectic around here for the past week but we will be back on track with posting next week!


CHEERS!

Tuesday, March 29, 2011

Spaghetti & Meatballs

Ah...spaghetti and meatballs. One of my favorite feel good foods. My dad makes the most amazing meatballs but for some reason even though I use the same recipe as him...I can never make them taste as good as his!

Since having this revelation I have been on a hunt for a delicious meatball recipe that I can add to my arsenal of cooking knowledge (which is quite small at this point!). I recently tried a Cook's Illustrated version of meatballs that was a ton of work and the end result was definitely not worth all the effort. Two of my favorite food bloggers happened to use variations of the same recipe so I thought it would definitely be worth a try. Since we love cheese in this house I did add some grated parmesan cheese to the meatballs which I really enjoyed. This recipe exceeded my expectations! We will definitely be making this again.


Spaghetti & Meatballs

Sauce:
Olive oil
1 large onion, chopped finely
4 cloves garlic, minced
1 can tomato puree (29 oz can)
1 can tomato sauce (29 oz can)
2 1/2 tsp dried parsley
1/2 tsp dried basil
2 tsp salt
2 tbsp sugar
1/4 tsp pepper

Meatballs:
1 lb ground beef
1 egg
1 tsp dried parsley
1 clove garlic, minced
1/2 cup breadcrumbs
1/4 cup grated Romano cheese
1/4 cup Parmesan cheese
1/4 milk
1/4 tsp salt
1/4 tsp garlic powder

For the sauce - heat olive oil in dutch oven over medium heat. Add onions and cook until translucent and soft. Add tomato sauce, tomato puree, parsley, basil, salt, pepper and sugar. Stir and bring to a boil. Lower the heat and let sauce come to simmer. Cover and let simmer for around 2 hours.

For the meatballs - in a large bowl mix together 1/4 cup of the breadcrumbs and the milk. Let soak for 10 minutes. Add remaining ingredients into milk/breadcrumb mixture and mix together with your hands. Form balls out of the mixture (we made about 12 large meatballs out of this). Add meatballs to the simmering sauce for last 45-55 minutes before the sauce finished cooking or until meatballs are cooked through.


Source: Adapted from Brown Eyed Baker


CHEERS!

Monday, March 28, 2011

Bell's Oberon

HAPPY OBERON RELEASE DAY!


Today is the official first day of summer (in my book at least!). I tend to measure my seasons by the beer releases...Oktoberfest means fall is here; Capital Brewery's Winterskal tells me winter has arrived; Maibocks alert me to spring's arrival; and Oberon is my signal that summer is finally here! Don't bother me with details like the current temperature and the fact that it just snowed here last week - I don't want to hear it!


CHEERS!

Homemade Pasta

This past Christmas I got something I have been wanting for a good while now...the pasta attachment for my Kitchen Aid mixer! We have only used it once - we made some sausage and cheese ravioli. The pasta part was a success...the filling-not so much. So this time I decided to just make plain fettucini style pasta to go with some homemade alfredo sauce (recipe to follow later). I used my Kitchen Aid mixer with the pasta attachments to do most of the work for me but the entire recipe can be mixed and cut by hand if you choose.

After making fresh pasta I really do believe it is worth the extra effort - the taste is just something you can't get with the dried pasta you find at the store.


Fresh Pasta:
1 1/2 cups all-purpose flour
1 1/2 cups semolina flour (I found this at my local Whole Foods)
1/2 tsp. salt
4 large eggs
1 tbsp. olive oil
2 tbsp. water

Mix the flours and salt together in a mixer using the dough hook attachment. Form a well in the middle of the flour mixture and crack the eggs into it. Mix until a shaggy dough forms. Add the olive oil - mix well. Add the water - mix well. Once dough has formed (and no more dough is sticking to the sides of the bowl), take the dough out onto a floured surface and knead until completely smooth. Break dough up into 4 balls and let rest under a moist towel for 20 minutes. NOTE: When not using dough make sure it is under a moist towel or the dough will dry out.

After dough has rested attach pasta roller to the Kitchen Aid mixer (or use a rolling pin if doing by hand). Take one dough ball and flatten to fit through roller. Start at the largest setting and run the dough ball through the roller. Slowly start making the roller setting thinner and thinner until the dough is the thickness desired for your pasta.

Next cut the dough piece into the desired length for your finished pasta (my sheets were cut into thirds). Attach the pasta cutter attachment (or if doing by  hand, fold the sheet into thirds and use a pizza cutter to cut the pasta) to the mixer and run each sheet through the cutter. When the pasta is cut place onto a floured surface and sprinkle flour over the top of the pasta so it won't stick together. Repeat with the remaining dough balls.

If making pasta right away - put the cut pasta under a moist towel until ready to cook. If saving for later - let pasta dry for about 10 minutes and then arrange into nests. Put nests on a baking sheet and into the freezer for about 20 minutes. Then put each nest into a freezer bag and save for later use.

Source: Annie's Eats


CHEERS!

Tuesday, March 22, 2011

Welcome

Welcome to the Baker and Brewer blog! We are a couple of 20-somethings living in the Chicago suburbs who love food and beer - after reading numerous food/beer blogs we decided to start up our own - a place to share new and old recipes and chronicle our adventures in brewing.

We hope you enjoy reading our blog!


CHEERS!